Thursday, August 30, 2012

Notebook Cover Tutorial

You will need forty 2.5" squares, a piece of batting 16.5" by 10.5", a fat quarter and a composition notebook. A typical charm pack (5" squares) will make four of these pieced covers. Just cut the charm squares in half both vertically and horizontally to get four 2.5" squares from each charm square. This is what I did for this notebook cover.

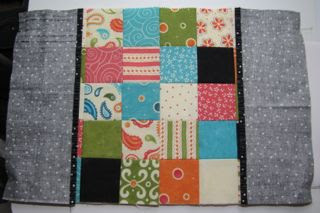
Start by laying out your squares in a 5 by 8 grid. When you are happy with the arrangement, sew them together in pairs.


You can sew them into rows and then sew your rows together. Or do like I do, sew them together into four patches so you can spin the centers to reduce bulk.


I add the top pairs to the middle four patches, then this to the bottom four patch and finally sew these all together to create the pieced outside of the cover.

Next you'll need to cut your fat quarter. This will be the lining and the side flap pieces into which you slip the notebook into the cover. Fold your fat quarter in half so that the selvedge is closest to you and cut a 10.5" by 21" piece and a 4.5" by 21" piece. Cut down the first piece to 10.5" by 16.5". Cut the second piece into two 4.5" by 10.5" pieces.

Press under one of the long edges of each of your 4.5" by 10.5" pieces a quarter of an inch. Then do it again. Now topstitch this down with matching thread.


Lay your batting down and your pieced cover on top, right side up. Then put your side flap pieces on top of this aligning the raw edges. I pinned the side flaps in place.


Baste the layers together by sewing all the way around the edge with a 1/8" seam allowance.


Flip this over and get your notebook. The corners of these notebooks are rounded. Place the corner of the notebook on your batting with the edges of the notebook 1/4" away from the raw edges of the batting. I just eyeball this. Trace the corner of the notebook on to the batting to use as a sewing line. Do this for all four corners. You can also do this on the lining fabric. My lining fabric is black so it would have been too hard to photograph this step if I did it on the lining fabric.


You can barely see the traced corner at the top left of this photo.
Click the image to enlarge it if necessary.
Now pin your lining fabric right sides together with the basted piece. Your batting should be showing on one side and the wrong side of your lining fabric is showing on the other side. Pin these together.


You need to leave about a 2" opening for turning this right side out. Make sure this opening will be underneath one of the side flaps. Mine is in between the two pins in the bottom right corner of the photo above. Sew everything together using a 1/4" seam allowance. At the corners sew on your drawn line as you go around the corner. And be sure to leave that opening for turning!


Clip the corners off to reduce bulk and turn it right side out leaving the side flaps flipped over wrong side out over the pieced cover.


Sew the opening you left for turning shut using matching thread. I put a couple of pins in my opening before sewing it shut. You can see them in the bottom left hand corner of the photo above.

When you have stitched the opening shut, flip the side flaps back to the lining side.


Insert your notebook and enjoy!


If you want some directions to print out, you can download the pattern here. As always, if something is not clear to you please just ask in the comments. If you would like for me to answer your question, please be sure I can contact you. If I can't, then I will just leave a comment on this post with my reply.

Wednesday, August 29, 2012

Hook Feathers

I'm trying a new free-motion design, hook feathers.


So far I've only done one row. I'm using this tutorial by Jenny of Sew Kind of Wonderful and Jenny's Doodling Needle. I can't decide if I want all the feather rows to go the same direction or if I should alternate. Jenny meanders a bit more than I did. This is my first time trying this design so I didn't want to get too fancy. So far, so good!

I also thought I'd share this cute picture of Spooky my son took. She is curled up inside a hat. How cute is that! After this picture was taken she went to sleep in the hat for about an hour. This hat fits on my son's head. He is 10 years old and does have a large-for-his-age head, but this gives you an idea of how tiny she is.


I bought him a camera before our trip at the beginning of July. He took lots of pictures on his trip and is getting pretty good with his camera. Rule number one for taking good pictures is to take lots of pictures. He has certainly learned rule one!


Tuesday, August 28, 2012

Shopping

I will be making another laptop carrier soon. This one will be for me. I'm going to use this as my main fabric.


It's a recent purchase from The Intrepid Thread. I purchased a couple coordinating prints to use for the binding and lining. I'm not sure why I didn't photograph them though. Um ...

I also did some shopping recently at my LQS. This is Cosmopolitan by Northcott.


And this one is Floral Whimsy by Northcott.


One of the benefits of working at my LQS is that I get to see the new fabric every week!

I taught a class on Saturday and my student used some of the Floral Whimsy main print for her project.


The class she took is the Color Theory for Quilters class I'm teaching this quarter. She did a great job!


Monday, August 27, 2012

Modern Monday

Block 45:


I reversed the colors on this one doing gray for the ship and pink/white for the background. This was the only sewing I accomplished last week. My classes started last Monday while my child does not start school until tomorrow. It is hard for me to work from home with my child at home. I'm really looking forward to tomorrow!

Go visit Caroll at Attic Window Quilt Shop to see how her ship turned out. Then visit Jenifer at 42 Quilts to see what we will be making this week. I hope to be able to sew tomorrow!

Kitten report:


Spooky Boo is her name, Spooky for short. A week ago Sunday she was still in bed at 9 am. I went to get her up and her little eyes were crusted shut. Poor thing! No wonder she was still in bed. She couldn't see!! She slept most of Sunday because she didn't feel well. First thing Monday morning I called the vet. and got her some medicine - oral antibiotic and cream for the eyes. We started treatment by 11 am on Monday. Tuesday morning she was climbing the curtains in the playroom. She feels much better now, misbehaving and playing like a kitten should. Our spray bottles for water are filled and have already been put to use disciplining Miss Spooky. Climbing curtains and my design wall are not permitted! She is learning.


Tuesday, August 21, 2012

Laptop Carrier

Over the weekend I finished the laptop carrier I was working on. It turned out pretty well.


The pattern called for Soft and Stable instead of batting. I really like the sturdiness and padding it provides, perfect for valuable electronics. It was also easy to work with. It has more structure than batting so when quilting the pieces you have to roll up the right side when it gets longer than the opening of your machine. But it rolls very easily. The product Soft and Stable is By Annie, as is the pattern I used.

I took a couple of photos of the inside of the carrier before turning it right side out. The edges of the bag are enclosed in binding, except for where the zipper is inserted. I did not take the time to read the pattern before picking out my fabrics. If I had, I probably would have picked a binding fabric that didn't contrast quite so much with the lining. Although the contrasting binding is better for these photographs.


I zig zagged along the edges where the zipper is inserted even though the pattern didn't say to do so. I plan to make another one of these and am working on how I can enclose those raw edges. Putting the binding in these edges was an "adventure" for me. I am also trying to figure out how I could make this part easier. For a start, I think cutting the binding strips wider would help me a lot.

The pattern called for a 16" and a 22" zipper. I used two 22" zippers and cut it to length for the outside pocket after attaching the pocket, like the pattern said to do. That worked well and I recommend using a larger zipper for the outside pocket. However, the 22" zipper isn't quite long enough for the top closure. Mine is about a 1/2" short on both ends. It isn't that noticeable and does not adversely affect the function of the bag, but it bothers me. The By Annie website also sells zippers in two sizes. I will get a double pull zipper, like the 30" zippers on the By Annie website, to use for the top closure next time. A thirty inch zipper will solve my problem.

There are no pockets on the inside of this bag but there is a large zippered pocket on the outside. (See the first photo above.) The pattern also includes instructions to make a laptop purse which does have pockets on the inside as well as a shoulder strap in addition to handles. I don't usually use my laptop carrier as a purse so that option didn't appeal to me, but it is nice that it is included with the plainer option I made up.


Monday, August 20, 2012

Modern Monday Quilt Along

Block 45:


Again I cut this one a little differently, 6.75" by 7". I've started to think about how I want to set these together and I think it might be more interesting if all the blocks aren't exactly the same size or square.

Go visit Caroll at Attic Window Quilt Shop to see her block. Then visit Jenifer at 42 Quilts to see what we will be making this week.


Friday, August 17, 2012

It's a Girl!

As we suspected, the vet. confirmed today that our new kitten is a girl. So the name Oscar is not going to work!

Meet Spooky.


Her eyes are still a bit crusty. She got some medicine for that today. She is about 8 weeks old and just the cutest little ball of cuteness you ever did see. She is so black that she is hard to photograph, kind of like a little black hole.

Maybe you can appreciate how tiny she is in this photo.


I haven't had much sewing time this week. I've been playing with Spooky and doing a lot of computer work in preparation for classes beginning next week. I am switching to teaching my courses online only which involves a lot of preparation work.

I was able to make a start on my laptop carrier. Here are the pieces so far.


I hope to get this finished up soon so I can make one for myself!


Tuesday, August 14, 2012

Charity Zig Zag Quilt

I really like this quilt!


I ran out of the pink background fabric I was using and had to substitute a different pink. Grrrr! It looks okay though. I'm not wild about the quilting design I used in the pink zig zags, but I'm glad I tried it. The design is functional but I don't think it really adds anything. I'll do something different on the next one. This was a fun, easy pattern so I will probably make another at some point.

Finished size is 42.5" by 54". For the back I used some Stampin' Up fabrics I was given by a friend.


They are larger than a quilter's fat quarter at about 18" by 28.5" which worked out well for the back of this quilt. The fabric quality is not as high a quilt shop quality, but acceptable to me. I think it is about the same as Hobby Lobby fabric quality.

I've said this before, but I'll say it again here, the pattern is called Super Zig by Monica Solorio-Snow. The pattern is free and you can find it here on the Lecien website. My blocks are 6" square, unfinished, so each of the zig zag pieces were cut 3.5" by 6" instead of whatever size the pattern says. I used my The Setting Triangle Ruler by Lynn Graves to figure out what size setting triangles I needed since my blocks are smaller than in the original pattern.

You can google "setting triangle ruler by Lynn Graves" and find lots of online sources for it if your LQS doesn't carry it. It's an excellent ruler to have on hand for quilts set on-point. Even though I know how to figure out what size setting triangles I need for any size square set on-point, it's nice to not have to figure it out if I don't want to. The ruler tells me what size strips to cut and then I use the ruler to cut the strips into triangles. Easy, accurate and fast!


Monday, August 13, 2012

Modern Monday Quilt Along

Block 44:


I cut this one at 6.5" by 7" instead of 6.5" square. I like the extra background fabric on the bottom. If necessary, when I put the blocks together I can trim it down some.

Go see Caroll's apron block at Attic Window Quilt Shop. Then visit Jenifer at 42 Quilts to see what we will be making this week.

Family Update:

As most of you know, our 2 year old cat, Goldie, died last month. I still miss her, but our house just didn't seem right without a cat around. We've been looking for the right cat for our family for a little while and found one yesterday afternoon.


I didn't crop out my shoes for scale. I wear a women's size 8.


He/she is tiny! Only 2 months old. I say "he/she" because the people we got him/her from said it's a male. I'm not so sure though. If it is a boy, his name will be Oscar. If it is a girl we haven't picked a name yet. I will be making a vet. appointment today to get shots and have it's eyes looked at since they are a bit goopy. Boy or girl, it sure is cute! Very friendly, so far is using the litter box but I'm not letting it roam the house at will yet. The house feels better now.


Friday, August 10, 2012

Friday Progress Report

Our summer is winding down and the school year is ramping up. As a result, I didn't spend much time in my sewing room this week.

Last weekend I was doing some cleaning and found a small stash of batting I forgot I had. I quick basted together my zig zag quilt and got it quilted. I'm at the binding stage right now.


I also got supplies to make a laptop carrier.


This first one will probably be a store sample. I'll make myself one next and I may make another one or two for gifts. The pattern calls for a new product, Soft and Stable, instead of batting. The pattern is by the inventor/creator/designer of Soft and Stable. I'll let you know how I like it after I try it.


Monday, August 6, 2012

Modern Monday Quilt Along

Jenifer didn't post a block for last week which allowed me to get caught up.

Blocks 39, 40 & 41:


Caroll won't have a new Modern Monday block posted since she wasn't behind, but go visit her any way at Attic Window Quilt Shop to see what she's up to. Then make a quick stop at 42 Quilts to see if the next block is ready.


Friday, August 3, 2012

Friday Progress Report

I had other plans for my morning today but my son sidetracked me. He wanted a blanket for one of his stuffed animals. This involved a trip to the quilt store for satin edge binding and while there he saw some Cuddle fabric that would be perfect blanket fabric. I used my own tutorial for a satin edge binding blanket. It sure was nice to not have to look for the written directions for this!

Gray and his new blanket
This week I finished piecing the top of my next charity quilt.

Super Zig charity quilt top
I used a free pattern called Super Zig by Monica Solorio-Snow. You can find the pattern here on the Lecien website. My blocks are 6" square, unfinished, so each of the zig zag pieces were cut 3.5" by 6" instead of whatever size the pattern says. It finished at a pretty good size, about 43" by 52". I'm out of batting right now and so is my LQS so I can't quilt it yet.

I also finished another reindeer. His eye is a little wonky. I'm not sure what happened but I'm not fixing it.


I think this might be the fourth one. I'm not sure. I'm working on the next one right now.

I'm also working on a Quilt of Valor. I don't have a good picture of it yet to show you. It is basted and waiting to be quilted. That was my plan for this morning but I had to go shopping and make a blanket instead.