Saturday, July 30, 2011

Summer Camp

Recently I won a Glamp kit from Amanda of the Quilted Fish for her Summer Camp program. My kit came this week.


Now I've got to make my Glamp and email Amanda a picture by Aug. 11th. I have two ideas: (1) a boy version for my son to match his Cub Scout quilt I made him last year.


Or (2) one for my new sewing room. I could use more light in here. I've got company coming tomorrow for the next week so I won't be able to work on my Glamp (or anything else) until next weekend. I should also let you know that I'm writing a pre-post or two, but don't expect to hear from me much next week.

The same day my Glamp kit arrived the border fabric I ordered for my disappearing four patch quilt arrived.


This fabric and all the printed fabrics in my Disappearing Four Patch quilt are Quilted Fish fabrics. This isn't really important, just interesting because the Summer Camp program is also being put on by the Quilted Fish.

Since my Lily is at the sewing machine hospital in Colorado Springs right now, I pulled out my Featherweight to finish up the Sweet Divinity Disappearing Four Patch.


She's not new or fancy, but sews beautifully. I'm so glad I have another machine now! Thanks Mom!

The completed top turned out pretty cute, if I do say so myself.


I had enough of the border print so I cut the binding from it too. I'm going to try to do something interesting with the back using the aqua and white solids and the little bit of left over prints I have. That will have to wait until after our guests leave too.

Friday, July 29, 2011

UFO Bust Report - Week 30

I'm proud to say that I have a finish to report this week. I finished the Cuddle Row by Row for my son. It turned out really well and he loves it, but I hope I never make another one of these.

First, the fabric sheds like crazy. Just look at my cutting mat after cutting the binding strips.


It wouldn't have bothered me so much except I had just cleaned the house really well before beginning the project. I ended up plugging in my vacuum and parking it just outside the door of my sewing room. I vacuumed myself off every time I left the room so that I didn't track the stuff all over the house.

Just look at the edge of my basting table after squaring up before sewing on the binding! I had the window open and it just blew all over the place upstairs.


The only way to piece this thing without going totally insane is to use spray baste. I bought the strips pre-cut in a kit. (I was so glad I didn't have to cut all those strips because of the mess it creates!) The kit contained an instruction sheet and a website address with a video to watch about piecing the project. It is just a quilt-as-you-go row quilt, but the video showed how to assemble the top using the spray baste. It was about 10 minutes long and worth watching. I would have started at one end and just sewn one strip at a time until done. The video showed to find the center, spray baste the center strip in place and then take two strips to the machine to sew on either side of the center. This saved time and trips up and down the stairs for me. You have to spray baste down each strip after you have sewn it before attaching the next one. For me, this meant I had to take the quilt upstairs, lay it out on my basting table, spray, then carry it back downstairs with the next two strips for sewing.

Of course, spray baste means sticky fingers.

 
This quilt is so heavy!! The fabric is fuzzy, like minky. It does not slide easily underneath the needle of the sewing machine because it is fuzzy and heavy. It is essential to use a walking foot for this project, in my opinion. My shoulders and neck were aching after getting this thing pieced because it is so heavy. I couldn't sew the binding on until the next day.

It turned out great though.


The backing and binding are solid black.


It measures about 60" by 72" and the boy absolutely loves it. I had to wash it right after finishing it because of all the spray baste and fuzz. It washed up great! I was worried that the fabric might lose some of its softness after washing, but it didn't. And there was surprisingly little lint in the trap of my dryer.

Not everyone would classify this project as a UFO. I hadn't started sewing on it but had purchased everything for it some time ago. I had planned to make this for my son for Christmas, but then I decided to do a quilt for my dad and didn't have time to do two big projects in December. It was taking up a lot of space in my sewing room so I'm really glad to have it finished and out of my room.

Hop over to Susan's to see what the other Little Green Quilters have been up to this week.


Thursday, July 28, 2011

Quilting in Quiet

My boys were gone the first part of this week - left Monday afternoon and returned Wednesday afternoon. As soon as they left I started on a UFO project. I'll show you my progress tomorrow as part of my UFO Bust Report.

I also worked on my wonky cross quilt I started at my last guild retreat. I decided to try an all over swirl. It's looking good!


I pieced the back using the aqua and white solid with a single stripe of one of the fabrics from the front.


I've got another print from the front I will use for the binding.

I've tried this all over swirl pattern before but could never seem to get a good, even fill of the surface. I'm not sure why I had trouble with this before, but I don't seem to be having any trouble now!

Well ... I'm not having trouble with the swirls, but I am having problems. Shortly after I paused to take the last photo, my machine started making a weird noise. I tried everything I knew to do, but nothing helped. So yesterday I had to drive it 175 miles (one way) to drop it off at the repair shop in Colorado Springs. Ugh! Luckily, the repair shop is a very nice quilt store, Ruth's Stitchery. However, I didn't buy anything from them. I'll shop there when I go back to pick up my machine after they fix it.

On the way home I stopped at another quilt store, Stitcher's Garden in Pueblo, CO. It is also a very nice shop. I got a pattern and some fabric and A MID-ARM QUILTING MACHINE. I'm so excited!!! I've been shopping around for a while and found one I like that I can afford and will fit in my small sewing room. It's a Handiquilter Sweet 16. It will be here next week. Unfortunately, we are having out of town company next week so I won't get to play with it as soon as it arrives. But our guests aren't staying that long and then I'll get to play, play, play until the semester begins and I have to go back to work.

Wednesday, July 27, 2011

More Pin Cushions

I finished the feedsack pin cushions I started a few weeks ago.


They turned out pretty cute, I think. I believe at least one of these will go with me to retreat for the pin cushion exchange we are planning.

I also finished up a few more thread catchers.


I had enough of this fabric to make 6, two of each fabric. These turned out really cute! I'm not sure what I will do with these so they have gone into my "finished gifts" box. It's always nice to a have a stash of finished handmade items!

Tuesday, July 26, 2011

Free Patterns

Recently I showed you a couple free patterns I got from a friend.


Well, one is a book of patterns and the other is just one pattern. My rule for keeping these was that I had to make them before the end of this year or give them away. I have read the Lazy Girl Designs pattern and this one looks like a good one. I just need to get some elastic.

The book has really cute bags in it and my friend had some fabric and the tubular handles required to make one of the bags in the book. I snagged those too from her pile. Last week I decided to make the bag but quickly realized why my friend was probably getting rid of these items. The book does not give you any cutting measurements. You have to copy and enlarge the patterns out of the book. First this involves going to a copy store. The pattern I was going to make was already full page size and it needed to be enlarged 150%. Then you have to find a copy store that will allow you to make a copy of copyrighted material. This should not be a problem since it says right on the pattern to "make a copy and enlarge", but some places are so worried about being sued that they won't allow you to make copies of anything that is copyrighted, period. At this point I decided that as cute as this bag is, it isn't worth all this time and effort. There are other just as cute bag patterns that don't require so much hassle before you can start cutting. So I'm taking the book, the fabric and the tubular frames to guild with me next month for the in-house raffle table.

The other pattern I pulled out is the Yellow Brick Road pattern. I had a little money left on my Mother's Day gift certificate to my local quilt shop, so I went and bought 6 fat quarters to use with this pattern.


I kitted this up and put it in my retreat bag for the end of October. I think it will make a fun retreat project.

Monday, July 25, 2011

Use It Up

In the process of painting and reorganizing my sewing room recently I found quite a few things I forgot I had. Among them was a stack of old curtains and curtain tiebacks. Some had been used as curtains fairly recently. Others I've been holding onto for at least 15 years, maybe longer. I kept them thinking I would cut them up and make something else out of them, but never did. The stack takes up quite a bit of room so I decided I needed to use it up or get rid of it.

Over the weekend I made a few tote bags. Since I was using all recycled materials and the pattern is quick and easy, I decided to make Morsbags. Click on the name to go to their website. You can read about them and get the free pattern there.

The first bag was made from a curtain I used in college!


The second bag was made from leftover fabric I was given and made some valances and pillow covers for our playroom. We are still using the valances and pillow covers in the playroom, but I have no other use for the leftover.


Notice the handles on the above bag are not made from the bag material. They are tiebacks from the master bedroom curtains in our previous house. We never used the tiebacks so I just put them in my sewing room. I had actually thrown the tiebacks away and dug them out of my sewing room trash bag for this bag!

I recently (about a year ago) changed the curtains in our living room and dining room. The old curtains are maroon cotton velvet from Target. They are sun-faded in places.


I'm not sure I'll make any more Morsbags out of these curtains. My sewing machine had a really hard time going through more than two layers of this fabrics. The handles are four layers alone. Attaching the handles to the bag was a real challenge because I had to sew through 6 or 7 layers. It does make a really nice bag though. I'll just try a different pattern next time.

So I used almost all of the fabric I had for the first two bags. I have enough left, and already cut, to make handles for a couple more bags. I still have quite a large stack of the maroon curtains though. I believe I bought 12 panels of them! They aren't very wide, but are 84" long. I'd like to find a pattern for which they work well, and then cut them all up into kits. Then I can make them as I have time.

Friday, July 22, 2011

Disappearing Four Patch

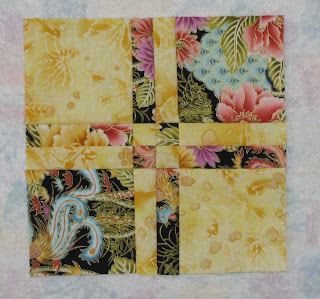
My guild swap block for this month is the Disappearing Four Patch. I made one from scraps and it was so fun I dug out some charm squares and made a bunch more.

This is the first one I made using scraps.


I won some Sweet Divinity charm squares last year and then was given some scraps of Sweet Divinity too. I don't usually make a "collection quilt" but decided I wanted to try something new. So I cut up the scraps I had into 5" squares to add to the ones I won.
Here is how you make the block. You need four 5" squares, two pairs of two different fabrics. Sew them together into a four patch.


Now you need to cut your sewn block. Having one of those little rotating cutting mats helps so that you don't have to move your pieces until it's all cut. I don't have one of those mats so I put my blocks at the corner of my mat and move around the table to make all the cuts. I can do that now because my sewing room is so organized. :o) Measure 1" away from the center seam, vertically and on both sides, cut the block. Do the same in the horizontal direction. See photo below.


With these four cuts you have created a nine patch out of a four patch. Now rotate or switch the center vertical pieces and the center horizontal pieces. See photo below.


Then sew your pieces together as you would a nine patch.


Starting with 5" squares, you will end up with an 8.5" unfinished block or 8" finished.

I had enough squares to make 13 blocks.


Not a great picture since the fabrics are so light they almost disappear against my design wall, but you'll see more photos of this one soon. Since I won or was given all the Sweet Divinity fabric used so far, I didn't feel bad about ordering a yard of one of the prints for the border. I'm probably going to sash the blocks with a solid fabric and then border it with the print I ordered. I may make a couple more blocks using a solid and the border print, or I may just turn in 13th block with my first block for the swap at guild next month.

I believe in crediting my sources. The instructions we were given at guild came from Sally at SewWonderful. Hop over here to her blog to see the block she made.

I have no UFO Report this week. However, if you look at my UFO list in the right sidebar, I'm doing pretty well for the year. There are 15 projects on my list and I have busted 9 of them already. Yay me! To see what the other Little Green Quilters have accomplished this week, go over to Susan's blog, Blackberry Creek Home Arts.

Thursday, July 21, 2011

Sewing Room "Completed"

I spent some time on Tuesday and Wednesday doing more sorting and organizing in my sewing room. I'm calling it "done." I put that in quotes because I still need my husband to hang my blinds, replace the electrical outlets, install the baseboards and put some hooks up in the closet. Those things will happen eventually, hopefully before ski season begins. Last summer I gave him a list of 5 things and told him that if he could do these 5 things before ski season started, I would not ask him to do anything else until after ski season. It worked out pretty well so I'm using the same strategy this year too.

On to the photos. These were taken this morning.


I have always enjoyed being in this room, surrounded by my fabric and other comfort items. Now, it is more organized and restful. I'm not sitting in my chair trying to relax but thinking about how I could better organize my stuff. Ahhhhh!

I found this basket though.


It contains freezer paper scraps. Does anybody else save freezer paper scraps? I started to throw them all away but I just couldn't. So I just sorted them to store them more neatly. I did get rid of all three bags of plastic bags though!

Tuesday, July 19, 2011

Crocheted Floor Duster Cloth

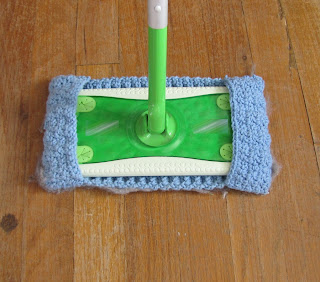
Last week a friend mentioned how she hated using the disposable duster clothes for her floor duster. She had a pattern for a crocheted one, but doesn't know how to crochet and was looking for someone to make her one. I thought this was a great idea since I also dislike the idea (and expense) of purchasing something designed to be used once and thrown away.

When I got home I googled for patterns. There are many. However, I didn't find exactly what I had in mind. And, I'm a beginner crocheter who doesn't completely understand how to read crochet patterns yet. Did I let that stop me? No! I have a dishcloth pattern that I really like (and understand) so I adjusted it to make a floor duster cloth.

Here is my first one.

the bottom of the cloth

top view

how it fits on the duster

But how does it work? Just for you, I tried it out on my hallway and dining room.


It seems to work really well. So there you go, a reversible, reusable crocheted floor duster cloth. I got the yarn on clearance for $0.75 a skein and it took me a couple hours of evening TV time to make. Cleaning isn't my most favorite chore, but I may dust my floors more often now that I have a cool new reusable cloth. Of course, I have microfiber cloths and washcloths I could use that work well, but this is designed to fit and just looks nicer.

Monday, July 18, 2011

Cleaning Out - sort of

I took a trunk full of stuff to guild on Saturday for the in-house raffle table. However .... I have a friend who is also cleaning out and she brought me stuff to take for her. I don't need anything! But I couldn't help myself. I kept a couple things from her pile.

Some bag patterns.


She even had some fabric and tubular frames for a carpet bag pattern in the book. I kept those too, but I must make the bag by the end of the year or I have to get rid of them.

She also had an eight month Block of the Month that includes fabric (flannel) and the pattern for each month. I don't think she even started month 1!


I kept it because I thought it was too nice to go on the $1 a ticket in-house raffle table. I also thought it would make a nice raffle quilt for the guild or one of the local charities we give quilts to for raffle. I don't really want to make the whole thing myself, but I plan to take it to the guild and see if someone will help me with it. It might make a nice retreat project in October.

I also kept a fabric bundle and pattern that I plan to use as a giveaway. I'm not showing you a photo of it yet though. I've got a couple of things set aside for giveaways to celebrate my 500th post. If I continue posting at my usual pace, the 500th post should be in late August or early September.

Sunday, July 17, 2011

Arrowhead Blocks

I learned how to make the arrowhead blocks yesterday at guild. You start with two squares, mine are 8" square, right sides together and sew around the outside leaving a couple of openings.


The little red plastic square is the marker we got so we didn't have to measure with a ruler on every pair where to leave the openings when sewing.

Then we made three cuts to each pair and sewed the pieces back together to form the block.


It's pretty cool! The interesting thing is that I started with 8" squares and these blocks measure 9", unfinished. Even though I understand the mathematics of why this happens, it is still strange. The instructions for this block and many others can be found in the book Rotary Cutting Revolution by Anita Grossman Solomon.


I only completed the two blocks shown in the previous picture above yesterday. I visited the rest of the time. Then the family went to the 5 pm showing of Harry Potter, because I decided I couldn't wait one more day to see it. Now I feel the urge to reread all the books.

Friday, July 15, 2011

UFO Bust Report - Finished Mom's Mystery Quilt!

Ahhhh - a finish! It feels good.


It's even has a label and is ready to be turned into our donation quilt chairperson at guild meeting tomorrow.

I experimented with the quilting a bit on this one. The feathers turned out okay.


I ended up just doing big loopies in the border and then echoed them a couple times. It's okay too. The main thing is that it is finished.

I'm most happy with the star.


Hop over to Susan's to see what the other Little Green Quilters did (or didn't) finish this week.


The husband and son are gone today for Cub Scout camp and it's a sleepover event too!! I plan to run a few errands this morning and then sew, sew, sew. If I can find some play sand I'll probably make a few of these


I'm getting close to my 500th post and I'm planning a giveaway. One of these is on the gift list and I have a couple of other ideas too. We'll see what I can get made before 500 arrives. I believe that this post will be 466.

Tuesday, July 12, 2011

Sewing Room Makeover Update and a New Project

The other fabric baskets I ordered arrived yesterday. I just got more of the same lagoon colored ones I ordered previously.


I'm not sure having my fabric hidden in baskets is a good idea, but I prefer the cleaner look and these baskets fit better on my shelves than the clear ones I originally planned to use. I did not take the time to sort through and neatly fold my fabric yesterday as I transferred it into the fabric baskets, so I still need to do that. I'd like to pull out older fabrics and either use them myself or pass them along to someone else who will.

This leads to my new project in which I am using three older fabrics from my stash. The program on Saturday after my guild meeting is going to be making Arrowhead blocks. Here are the three fabrics I'm using, a colorful cat print, a rainbow stripe, and a purplish-blue tone-on-tone print.


The pattern calls for two yards of two fabrics. I had two yards of the cat print, but not enough of anything that would complement the cat print. I plan to learn the technique with these fabrics and make the quilt as a donation quilt. So you have these blocks to look forward to seeing next week!

In other news, I have almost three sides of the binding sewn on Mom's Mystery quilt. It's looking good that I'll be able post a finished UFO on Friday!

Monday, July 11, 2011

Feedsack Sampler and a New Blog

I only still own one of the feedsack quilts I've made. I'm still looking for photos of the others. So this is the first one. I call it Feedsack Sampler because it contains a sample square (actually 2) of every feedsack fabric I had at the time. It was completed in May 2006.


I quilted it by hand and quilted my son's traced hand in each of the squares.


I documented the quilt quite well on the label. Click on the image to enlarge it so you can read the label.


I'm contributing to a new blog about free motion quilting. The blog is called Celebrating! Big Girl Pants. I made my first post on it this morning. Check it out here. I finished quilting one of my UFOs. Hopefully I'll get the binding finished by Friday and be able to post a finish on Friday for my Little Green Quilters UFO report on Susan's blog Blackberry Creek Home Arts.