Tuesday, April 30, 2013

Swimsuit Bag

I saw this bag on my friend Stephanie's blog recently and decided I needed one too.


It's a bag for your wet swim suit.


It is made from laminate and lined with the same. I doubt that it is completely water tight, but if you wring out your suit before putting it in the bag you should be able to get it home without soaking the rest of your stuff. I know you can just wrap a wet suit in a towel, but this is much more stylish. It will probably also keep your clothes dry while you swim.
I wrote up some basic instructions for how I made the bag. We (by "we" I mean my LQS, Heartstrings & Heirlooms) will be giving away the instructions with every purchase of one yard of laminate fabric. One yard is enough to make one of these bags and maybe two depending on how wide the laminate is you choose. Just in time for summer.


Monday, April 29, 2013

Finished - Finally!

This took much longer to finish than I planned.

Bohemian Stripe

My Bohemian Stripe is done! It isn't perfect, but done is better than perfect. Below is a close-up shot of the back. You can see the chevron quilting pattern better on the back.

Quilting detail from the back

I used wool batting. It measures about 60" by 74". As you can see, I did use the original pieced section on the back.

Back
I bought all my LQS had left of my favorite print and used it on the top portion of the back. The bottom part of the back you can't really see in the photo above is the rest of the width of fabric stripes I cut for the top portion used on the front. The binding is made from two of the brown prints. The two I had enough of left over.

This one will live at my house. My husband complained some time ago that neither of the sofa quilts we have in our living room are long enough to cover him well. This one is plenty long enough!


Friday, April 26, 2013

Progress Report

My goal for today is to finish quilting my Bohemian Stripe.

Looks pretty good from the back
I have all of the straight lines quilted. Now I am just filling in between some of them.

My door is completely beaded.


Click here and here for previous posts about my "Love Shack" beaded door project. I am still thinking about how I can have the door open when I want. My best idea so far is buttons and black pony tail holders. I just need to find the "safe place" I put the pony tail holders I purchased for my stash!


Wednesday, April 24, 2013

Mid-week Science Lesson

This has nothing to do with quilting, but is interesting none the less. Take a minute to think about what would happen if you wring out a wet wash cloth in space (with no gravity). Once you have made a prediction, watch this 3 minute video to see an astronaut actually do this.


I did not guess correctly. Did you?

In case the video does not work for you, here is the direct link to it on YouTube.


Tuesday, April 23, 2013

Jumping on the Bloglovin' Bandwagon

Love Shack Progress

I'm still working on my door with beads art group 12 by 12. I'm calling mine "Love Shack." Here is what it looked like without any beads.


This is what it looks like this morning.


Over the weekend my husband commented on how he thought I'd have been done with this already. He didn't realize that I am stringing all these beads by hand.


I've been dumping various beads into the square container in the foreground. As necessary, I refill the square container to maintain a good mix of beads for my strands.

One of the other members of my art group suggested that I put some buttons along the side so that the door can be "open" sometimes. I'm going to try to make this idea work. But, first I'm going to finish beading the door.


Monday, April 22, 2013

Guild Challenge Reveal

My guild members revealed our challenge pieces at our meeting on Saturday. The theme was "colorful Colorado." The maximum size was 30" square and the minimum was 1" square. No one went that small, but my piece was one of the smaller ones.

This is what I made.


It is about 9" by 12". The top is all made of wool and perl cotton threads plus a couple of buttons. It is all done by hand.

I tried a new-to-me finishing technique - facing. I used this tutorial by Victoria of The Silly Boo Dilly. Her directions and accompanying photographs are excellent. I had no trouble doing the facing and I'm very pleased with the results.

Here is what the back of my piece looks like.


I should add that I did not put the back piece of fabric on until after I was done with all the stitching on the front. For these types of pieces, I prefer to cover the back to protect the stitching. Doing this also hides all the knots and I don't have to worry about hiding them between the layers.

Here is a side view.


If you ever need to finish a quilt with a facing I highly recommend Victoria's tutorial and her method for doing this.

Also on display at our meeting was the quilt several guild members made for Alamosa County's upcoming centennial celebration. The county turns 100 on July 4th of this year.


All the information about the quilt, the significance of the various blocks and the makers can be found on our guild website.

Friday, April 19, 2013

Squishy Mail - Argh!

I've been in what I'm calling "roster reconciliation hell" this week. I won't bore you with the details, but it has required long hours on the computer for three days this week. I turned everything in this morning.  Yay!

In the midst of all this yesterday afternoon, the mailman brought such a nice surprise.


A gift from my friend Stephanie. She posted this Pirate Girls fabric on her blog recently and I commented on how adorable it is. Below is a photo of one repeat.


So she picked me up a fat quarter of it along with a couple of companion prints and a cute little zipper pull to match. I'm feelin' the need to make a bag with this little bundle. Thank you Stephanie!!!

I also have gotten that pen I told you about yesterday to work again. I'm about halfway done with marking the remaining part of the quilt. I can only tolerate doing a little at a time but don't want to take to long in case the pen decides to quit cooperating again. Hopefully by the end of the day I'll have it done and can get back to the fun part - the quilting.

Nothing I tried yesterday with the pen was successful. So I just put it down and went to work. This morning when I tried it I didn't press down very hard and tried to keep the pen as vertical as possible. And it is working again. Go figure!


Thursday, April 18, 2013

New Tools

I've been having a hard time getting my Bohemian Stripe quilted, mainly because I don't have a good way to mark on dark fabric. My usual method is a sliver of Ivory soap, which works great, but rubs off easily. So I can only mark two or three lines at a time. It is frustrating to have to stop and take the quilt back to my basting tables (so I don't have to crawl around on the floor) and mark the next few lines. Everything else I have either rubs off too easily, doesn't mark well enough on an already basted quilt or won't show up on the dark brown fabrics.

So I'm trying a new-to-me white marking pen.


At one time these pens were the most returned item at my LQS. Why? Because when you first mark with it you can not see what you have just drawn. You have to wait one or two minutes for the "ink" to dry before it will show up. I put "ink" in quotation marks because I have no idea what chemical substance is actually in this pen. I didn't take a picture with the cap off, but it does look like a ball point pen.

I wrote my name on the little scrap of solid black fabric. You may have to click on the picture to enlarge it so you can see it. The lines are hard to photograph, but I will have no trouble seeing them well enough to quilt them. Yay! I think this is the solution for me and this Bohemian Stripe quilt. I hope to get the rest of the lines marked soon then I will be able to just quilt.

By the way, the packaging says that the "ink" will disappear with heat (that is, iron over it) or when washed. I haven't tested the washing part, but my name did vanish immediately once I hit it with a hot iron and did not return once the fabric cooled. I have not tried putting it in the freezer to see if that will make it come back. I plan to wash this quilt once it is finished so hopefully that will remove all traces of this "ink" from the quilt.

Edited to add later this morning: I just tried to continue marking and now the pen is not working. I have waited 5 minutes and the marks are not showing up. I am trying the recommendations that came with the packaging. So far, no luck. Do not rush out and buy one of these pens just yet! I'll keep you posted on how it goes.

I also decided it was time for a new pair of machine quilting gloves. My preferred brand is Machingers.


Believe it or not, the old ones were just washed and they still look really grubby next to the new ones.


Tuesday, April 16, 2013

12 By 12 Progress

I'm pleased with how far I was able to get yesterday on my art group project. As a reminder, the theme is "door" and the technique is "beading."

First I made the base with the door way.


Spooky helped by keeping my sewing chair warm while I took a short lunch break.


Then it was time to add the beads.


The beads are also going to be the door. It is only partially done, but I think it is done enough that you can get the idea.


The idea for this came from one of my other art group members. She mentioned the idea for a beaded door but had already started on a different idea she had. I asked if I could use her idea. For some reason this reminded me of The B-52's song "Love Shack." I don't know if the shack in their song had a beaded door or if it even had a door.

I received the hunk fabric as a door prize at guild one month. I had no idea what I would do with it, but thought it was pretty funny fabric so I kept it. I'm not sure if my husband approves or not of this little project. When he saw it yesterday afternoon he didn't say anything.


Monday, April 15, 2013

This and That

I have't had much time for sewing recently. I have made no progress on quilting my Bohemian Stripe since last Tuesday.

This doesn't mean I haven't done any sewing. I have finished my challenge piece for this months guild meeting. I don't want to show it to you yet though. The next meeting is this Saturday. I'll show it to you next Monday.

I got the binding on my art group piece, Timelines.


We decided to bind them all in black since they are going on a black background.

I'm binding another black background for my art group.


And I'm working on the next 12 by 12 project my art group is doing. We've changed up our procedure a bit for these 12 by 12 projects. Instead of just drawing a theme each time, we are also drawing a technique. The theme is "doors" and the technique is "beading." Here is what mine looks like this morning.


I know! It's barely started and our next meeting is tomorrow! I know it won't be done by tomorrow, but I hope to get a good start on it this afternoon. It took me a while to come up with an idea that excited me. Then I had to order the black and white peace sign fabric. The beading part will take a good amount of time, but I should be able to get the rest done fairly quickly. I plan for it to be fairly simple so the beading can be the focus.


Friday, April 12, 2013

Still Quilting

I haven't had much time to sew recently, but the time I have had I've spent quilting my Bohemian Stripe.


I've come to the conclusion that marking the lines is easier for me than using the ruler alone. The ruler tends to slip. With a marked line I can easily see when I'm getting a bit off. However, marking the lines is time consuming. I should be pretty good at stitching straight lines by the time I finish with this one.


Tuesday, April 9, 2013

Cinch Sack

Are cinch sacks popular where you live? All the cool kids are using them here. We recently got a new book in at my LQS with 8 projects geared towards teen and tween girls.


I picked up a copy of the book to give as a gift. I decided to try out one of the projects before giving it away. The project I chose was a cinch sack.


It turned out so cute! Especially made up in this new fabric we just got in! However, this sack is huge! It measures 17" by 22" finished. My son's friend carries one of these as a backpack. His doesn't have flowers on it though. Anyway, I measured his and it is 12" by 16", which I thought was a little small. I think the perfect size is somewhere in between.

I bought some baseball fabric to make a "boy" version as a sample for my LQS. I think I'll make it 15" by 20". Fortunately, or unfortunately, all of the books are now sold from my LQS. I made this sack up on Saturday and ended up selling all the books in the process, which was kind of the point. However, I had planned to get to display my cute bag next to the book and now ... oh well! I think we should order some more books!

Monday, April 8, 2013

Modern Monday

The blocks are together!


It measures about 64.5" by 64.5" right now. I used four colors for the sashing, all Kona solids: white, ash, medium gray and black pepper.

It will go onto the "to be quilted" list which is rather lengthy at the moment. At least I don't have to worry about losing one of the blocks anymore. I may lose the entire top, but at least all the blocks are together!


Friday, April 5, 2013

On the Border of Insanity

Are you familiar with the blog Green Fairy Quilts? If not, just click over and look around for a minute. I'll wait and you'll be glad you took a peek!

........

See what I mean? I have been envious, infatuated and just plain gobsmacked by the work Judi does for some time. Today I'm attempting my own version of some of the things Judi does. Holy Half-Square Triangles! This takes a long time!


This little bit has taken me about 4 hours. Granted, I'm nowhere near as practiced at this as Judi is, but sheesh! Usually I go through a bobbin about every 30 minutes. I'm still on the first bobbin after 4 hours!

Part of what is taking so long is that I'm using my only long arm ruler to do the straight lines. I have to go pretty slow on this part because I'm learning how to use this ruler. Right now it isn't as easy for me as the back and forth or circles.


Honestly, at this point I'm pretty sure it would be faster for me to use my BERNINA and the walking foot to do the straight lines. But I'll never get good with my Sweet 16 and a ruler if I don't practice.

I can't afford to spend any more time on the computer! I've got to mark registration lines for the next part and get back to quilting! Yes, you read that right, I am marking on this quilt. It's the only way to get even semi-straight lines. But I'm only marking a few registration points and letting the ruler do most of the work. It only takes a few minutes to make the necessary marks and is totally worth the effort for this kind of design.


Thursday, April 4, 2013

Thursday Edition of Modern Monday

I finally got tired of moving my Modern Monday blocks around my sewing room and decided to sew them together! I was afraid to "put them some where safe" because that usually means I won't be able to find them when I want them.

I started by sorting my 64 blocks into four groups of 16.


I'm using white, ash, medium gray and black peper for my sashing. The bottom stripe is the awesome fabric I found for the binding.

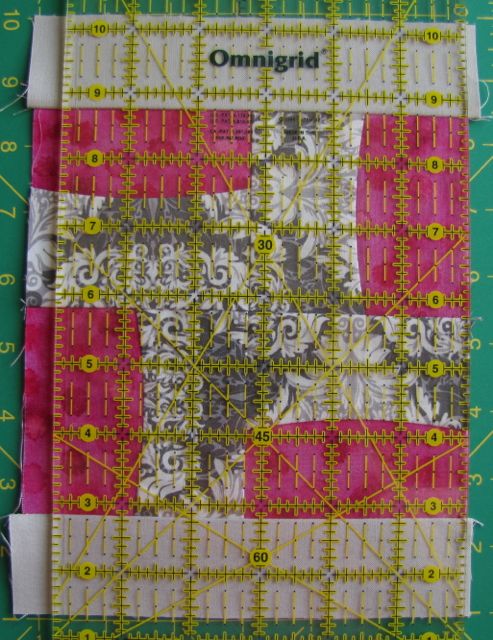
All of these blocks were suppose to be 6.5" square at this point, but with all the improv piecing involved mine varied between 5.75" and 7". A few of them aren't even square. So how do you go about getting these all to end up the same size after sashing? I don't know how other people do it, but I'll show you what I did.

First, I wanted these to end up 8.5" square which would mean that I needed to cut 1.5" wide strips for the sashing pieces if my blocks were 6.5" square and I was being exact. Since not much about these blocks is exact, I decided to cut my sashing pieces 1.75" wide so I would have some room to trim them down to size. Blocks that were significantly smaller than 6.5" got wider strips. I decided not to worry about trying be exact and just cut 2.5" wide strips for the smaller blocks.


Above you can see one of my smaller blocks along with the wider 2.5" strips I cut for it. I put the 1.75" in the photo too for comparison.

All of my larger blocks I was able to just trim down to 6.5" so I didn't need narrower strips.

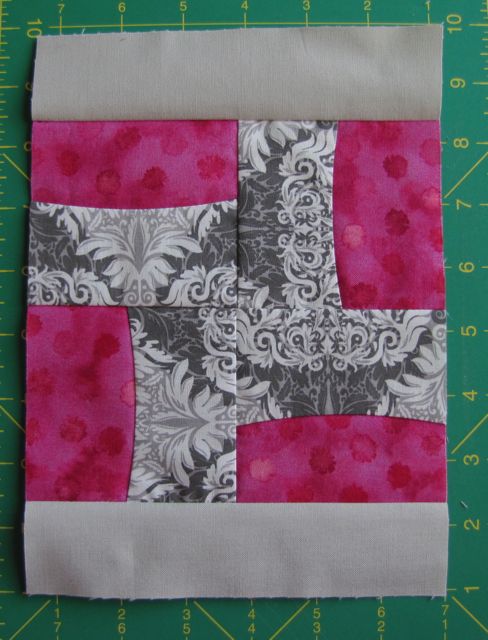
I also cut my strips a little longer than 6.5" so I wouldn't even have to worry about lining up the ends. I cut my short strips 1.75" by 6.75" and my longer strips 1.75" by 9". Step 1 is to sew a short strip to two opposite sides of each block.

They look like this after step 1. See the little bits of sashing strip hanging over each end?


To fix this I trimmed those sides even with the edge of the block, trying to also square things up as necessary.


I lined the right hand side of the ruler up with the right hand side of the block. But I also lined up the ruler with the seams I had just sewn when attaching the two sashing strips. Doing this ensures that you keep everything square, which is important when you want to end up with a square.

Trim.


Flip it around and trim the other side the same way. You should end up with two nice even edges to sew the other two sashing pieces to.


Attach the other two sides. Again, some bits of the sashing may be sticking off the edge. Who cares! The next thing you are going to do is square the whole thing up to 8.5".

This works best with a square ruler. For the block below, the center is easy to find. Half of 8.5" is 4.25" so I put the 4.25" lines down the center of the block. I also figured out that the left and bottom edges of my sashing should be at 7.25" while the right and top edges of my sashing should be at 1.25". So I make sure everything is lined correctly, then cut the right and top edges.


Turn the block, line everything back up and cut the remaining two sides. Viola! A nice 8.5" square block.


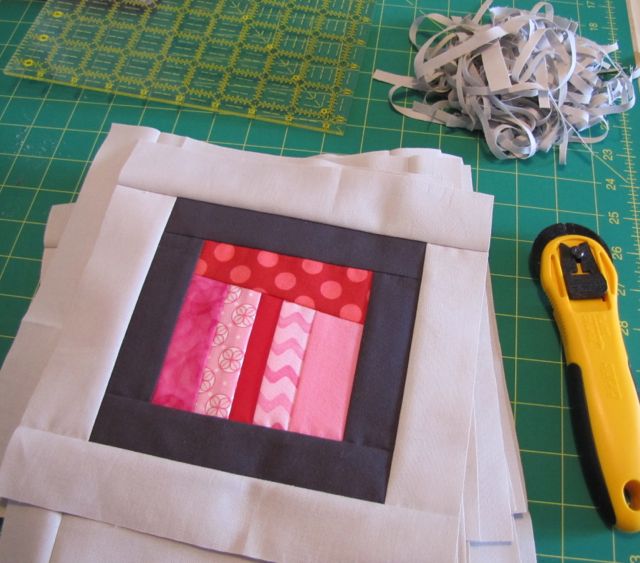
Repeat as necessary. Is this fast? Not really. I try to "enjoy the process" instead of worrying about being fast. Does this waste a bit of fabric? Yes, but it's better than getting frustrated trying to piece together blocks that aren't the same size and thus will never go together nicely.


This is one stack of 16 blocks trimmed and the waste. You could put this into a pillow case for a dog bed if you are really worried about wasting fabric. Me? I just threw this away.

After a few hours of work I now have four nice piles of sashed 8.5" square blocks to play with.


Next step will be deciding on a layout.