
What you will need:
Fabric and the pattern, download it here, you will need to scroll down a bit. Below the header image is a link to download the pattern for the surgical cap. 5/8 yard of fabric will make four caps but you can also use scraps. The pieces don't have to all be from the same fabric.
Be sure your printer settings are correct: no scaling, print at 100%, uncheck the "fit to page" box if it is checked. If you have problems printing the pattern and want me to mail you a printed copy send a self-addressed stamped envelope to:
After you have your pattern, I suggest you keep the original somewhere safe. Then print or trace a copy of the pattern onto freezer paper. You can use the freezer paper pattern multiple times. When it stops sticking to your fabric just make a new one.
Cutting: cut a 9" by WOF (width of fabric) strip. It comes off the bolt folded in half. I folded it in half again so that you have a 9" by about a 10" piece. Iron or pin your pattern piece to this.

Then cut out around the pattern piece. This will give you four cap tops.
From the remaining fabric, cut (2) 3.5" by WOF strips, subcut these into (4) 3.5" by 19.5" rectangles. These will be the hat bands. Finally, cut (4) 1.5" by WOF strips for the ties. You could also use 1/2" or 3/8" double fold bias tape. I prefer to make my own for most things so this isn't something I have in my stash, AND there is no need for this to actually be cut on the bias. Notice that I didn't tell you to cut these on the bias, just a regular width of fabric straight cut is fine. Trim the selvedges off the ends of the tie pieces before continuing.
To make a cap you will need one of each piece, that is, one cap top (cut from pattern piece), one cap band (3.5" by 19.5") and one cap tie (1.5" by WOF).

On the cap top, press under the straight edge 1/4" twice. On the cap band, press under the two short sides 1/4" twice.

Since you are at the ironing board already, take the tie, press it in half lengthwise.

Then open it up and press both raw edges to the center seam. At each short end, press it in about 1/4" to conceal the raw edge inside once it is sewn.
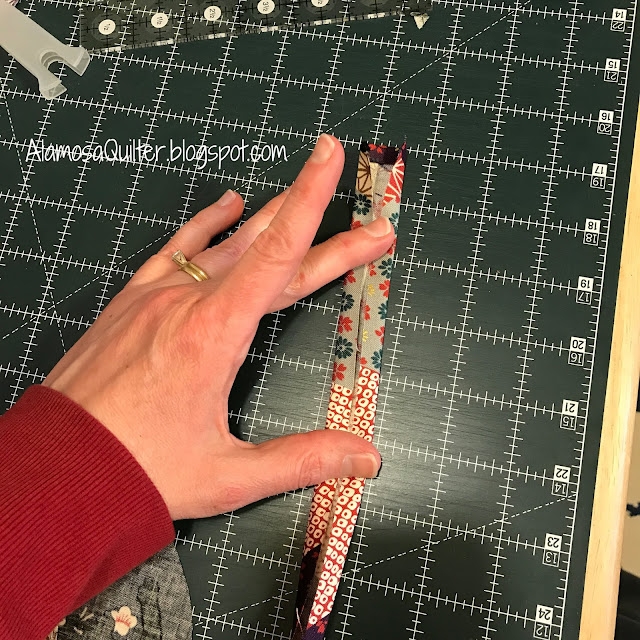
And then press it back in half again on the original fold you made.

Go to your sewing machine and topstitch the edges you pressed under on the cap top and cap band.

Fold the tie in half and the cap band in half. Mark the centers. Do the same for the cap top, but the center mark you make needs to be on the side opposite the one you topstitched, the edge that has the rounded corners.

I like to give them a press rather than use a pin. In the photo below, the tip of the scissors are pointing at the pressed center of the band and the tie is clipped to the bottom edge of the cap band. The tie is longer than the cap band. Just match up the centers and clip/pin them together so that the ties are the same length on either side, or at least pretty close to the same length. This doesn't have to be perfect!

Before you sew, make sure that you have the tie on the BOTTOM edge of the cap band. In the photo below I wanted the sleeping kitty to be right side up so the tie is going on the edge below the kitty. It won't make a bit of difference in the functionality of the cap if the kitty is upside down, but if your fabric is directional and if this kind of thing bothers you, take the time to make sure your motifs are right side up.

Topstitch the tie closed and to the cap band. I just start sewing at one end of the tie right across to the other end.

Now match up the centers of the cap band and the cap top, pin or clip.

Then match up the two ends of the cap band to the back of the cap top (the edge that you topstitched). Add a few more clips or pins in between.

Using a 1/4" seam allowance, sew the cap band to the cap top. Don't worry if there are a few puckers or if your seam allowance gets a little wider than 1/4". Again, this doesn't have to be perfect!

I took a close up picture of a portion of my seam to show you that even this one isn't perfect, but the cap will function just fine! My scissors are pointing to the less than perfect match up.

As a final touch, zig zag over the raw edges of this seam. This will help tame the fraying. As an alternative, if you have a serger, you could use it to serge the final seam instead of sewing and then zigzagging.

Turn the cap right side out and you are done!

If you are local, bring your completed caps to the shop. As needed I will take them over to our hospital for their stash of these caps. The kids get to choose which cap they want before surgery. Also, if you want to make size adjustments to the pattern to make some smaller versions, feel free. This one fits smaller adult heads as well as most children. The ties help to make it more adjustable.
Thank you to the several children and their parents who came into the shop while I was working on the pattern and allowed me to try it on them!

Fabric and the pattern, download it here, you will need to scroll down a bit. Below the header image is a link to download the pattern for the surgical cap. 5/8 yard of fabric will make four caps but you can also use scraps. The pieces don't have to all be from the same fabric.
Be sure your printer settings are correct: no scaling, print at 100%, uncheck the "fit to page" box if it is checked. If you have problems printing the pattern and want me to mail you a printed copy send a self-addressed stamped envelope to:
Alamosa Quilt Company
710 Del Sol Drive
Alamosa, CO 81101
Simply slip a note inside that says "please send me a surgical cap pattern" and I will pop one in the mail to you right away. If you are local, you can just stop in and ask for a printed copy of the pattern.After you have your pattern, I suggest you keep the original somewhere safe. Then print or trace a copy of the pattern onto freezer paper. You can use the freezer paper pattern multiple times. When it stops sticking to your fabric just make a new one.
Cutting: cut a 9" by WOF (width of fabric) strip. It comes off the bolt folded in half. I folded it in half again so that you have a 9" by about a 10" piece. Iron or pin your pattern piece to this.

Then cut out around the pattern piece. This will give you four cap tops.
From the remaining fabric, cut (2) 3.5" by WOF strips, subcut these into (4) 3.5" by 19.5" rectangles. These will be the hat bands. Finally, cut (4) 1.5" by WOF strips for the ties. You could also use 1/2" or 3/8" double fold bias tape. I prefer to make my own for most things so this isn't something I have in my stash, AND there is no need for this to actually be cut on the bias. Notice that I didn't tell you to cut these on the bias, just a regular width of fabric straight cut is fine. Trim the selvedges off the ends of the tie pieces before continuing.
To make a cap you will need one of each piece, that is, one cap top (cut from pattern piece), one cap band (3.5" by 19.5") and one cap tie (1.5" by WOF).

On the cap top, press under the straight edge 1/4" twice. On the cap band, press under the two short sides 1/4" twice.

Since you are at the ironing board already, take the tie, press it in half lengthwise.

Then open it up and press both raw edges to the center seam. At each short end, press it in about 1/4" to conceal the raw edge inside once it is sewn.

And then press it back in half again on the original fold you made.

Go to your sewing machine and topstitch the edges you pressed under on the cap top and cap band.

Fold the tie in half and the cap band in half. Mark the centers. Do the same for the cap top, but the center mark you make needs to be on the side opposite the one you topstitched, the edge that has the rounded corners.

I like to give them a press rather than use a pin. In the photo below, the tip of the scissors are pointing at the pressed center of the band and the tie is clipped to the bottom edge of the cap band. The tie is longer than the cap band. Just match up the centers and clip/pin them together so that the ties are the same length on either side, or at least pretty close to the same length. This doesn't have to be perfect!

Before you sew, make sure that you have the tie on the BOTTOM edge of the cap band. In the photo below I wanted the sleeping kitty to be right side up so the tie is going on the edge below the kitty. It won't make a bit of difference in the functionality of the cap if the kitty is upside down, but if your fabric is directional and if this kind of thing bothers you, take the time to make sure your motifs are right side up.

Topstitch the tie closed and to the cap band. I just start sewing at one end of the tie right across to the other end.

Now match up the centers of the cap band and the cap top, pin or clip.

Then match up the two ends of the cap band to the back of the cap top (the edge that you topstitched). Add a few more clips or pins in between.

Using a 1/4" seam allowance, sew the cap band to the cap top. Don't worry if there are a few puckers or if your seam allowance gets a little wider than 1/4". Again, this doesn't have to be perfect!

I took a close up picture of a portion of my seam to show you that even this one isn't perfect, but the cap will function just fine! My scissors are pointing to the less than perfect match up.

As a final touch, zig zag over the raw edges of this seam. This will help tame the fraying. As an alternative, if you have a serger, you could use it to serge the final seam instead of sewing and then zigzagging.

Turn the cap right side out and you are done!

If you are local, bring your completed caps to the shop. As needed I will take them over to our hospital for their stash of these caps. The kids get to choose which cap they want before surgery. Also, if you want to make size adjustments to the pattern to make some smaller versions, feel free. This one fits smaller adult heads as well as most children. The ties help to make it more adjustable.
Thank you to the several children and their parents who came into the shop while I was working on the pattern and allowed me to try it on them!
No comments:
Post a Comment