Friday, January 28, 2011

UFO Bust Report - Charity quilt finished

Seems like all I needed was a reason to get some UFO projects finished. I completed two this week. Both are small (crib size) charity quilts. These just needed quilting and binding to be complete. The Pooh quilt was pieced at my guild retreat at the end of October 2010. The Cars quilt was completed at the same retreat but I started piecing it a year earlier. These will be donated to our local sheriff's office in March.

Pooh charity quilt

Cars charity quilt

I had my worst quilting experience ever on the Cars quilt. I spray basted both quilts then went to work quilting them. I used YLI variegated 40 wt. thread for the Cars quilt. Despite rethreading, changing bobbins, changing needles half a dozen times and adjusting the tension multiple times, the thread broke every three to six inches during the first half of quilting this quilt! On the second half it didn't break as often but still more than it should. I slowed my machine speed dramatically from the speed I usually quilt at. The thread didn't break as often, but my machine was skipping stitches all over the place. I have used this thread before successfully, but I don't think I've ever used it with a spray basted project. I switched to Mettler 50 wt. for the Pooh quilt and had no problems at all - no breaking, no skipping stitches and all at my normal quilting speed. I even used one of the rejected needles from the Cars quilt with no problems.

So I will not be using YLI thread with spray baste ever again. Or maybe I will spray baste a small sample piece and try it with YLI and other threads to see if the YLI gives me problems. I thought that maybe I used too much spray baste but I basted both quilts at the same time and I'm reasonably sure I did the same thing for both. The fact that the Pooh quilt with Mettler thread caused zero problems and the Cars quilt with YLI thread was a nightmare leads me to believe that the difference must be the thread. Everything else was the same for both quilts.


Thursday, January 27, 2011

January Sketchbook Pages

The theme for the sketchbook challenge for this month is "highly prized." I have been doing a lot of sketching compared to what I am accustomed to doing. In reality it has been once, maybe twice, a week for at least 30 minutes a session. These are the sketches I posted on the Flickr group.


I chose these images to post for "highly prized" not because they are images of things I highly prize, although I do like trees and birds, but for what they represent to me. That is, spending time learning something new and realizing that I can draw something I like. Just taking the time to experiment with drawing and allowing myself to redraw the same thing, tweeking parts of the image and/or changing it to try something new, just to see what the change looks like.

Tuesday, January 25, 2011

3rd Grade Field Trip

On Mondays I volunteer in my son's class for a little bit in the afternoon. Yesterday they went on a field trip during my time to volunteer. They walked downtown to view the Ice Sculptures and have hot chocolate at a local coffee house.

This is the second year Alamosa has had Ice Sculptures downtown. I think the idea is to get people downtown during the winter. It has been so warm here this winter that only 3 of the 6 statues were still standing, the three on the south side of the street which are in the shade all day.

The theme this year is wildlife.

stallion

buffalo

bear

The bear is showing signs of melting.


These have only been standing 10 days. Last year the theme was railroad and the sculptures on both sides of the street hung around into March. Of course, for the one hour we walked around downtown it was cloudy, cold and snowed!

Monday, January 24, 2011

Numenorian Design Progress

I have slowly been making progress on my little Tolkien inspired Numenorian design. I started with a very basic sketch. I can't find my sketch at the moment, but it was essentially what I have stitched below.


I stitched out the design by machine after drawing it with a little sliver of Ivory soap. Just stitched on the drawn lines. Then I started filling in with hand stitching.


I'm stitching with number 8 white Pearl Cotton. This last photo is where I am with this right now.


The next step will be to cover the machine stitched lines from the first photo with thin crochet yarn. After that, I don't know what I will do next. I've got plenty of time to think about it though.

This series of photographs, all of the exact same piece in various stages, really demonstrates how uneven the lighting situation is in my sewing room. I need to work on that! I should also work on learning to edit my photos better. It's on my list for this year.

Saturday, January 22, 2011

Unruly Letters and Words

I told you that I got a new book recently, Word Play Quilts.


I just had to give this a try. It was lots of "fun."


This is a sneak peak of the project Stephanie and I are working on together. We are working through the book Intuitive Color and Design.


This is the book my art group has been working through lately but we are pretty much done. I am still really enjoying working this way so I'm going to go through it again with Stephanie. I sent her a box of some Kona solids from my collection and I cut myself the same fabrics. For this first exercise we are only using these fabrics. You can read Stephanie's post about our challenge here. Both of us will post about our work around the end of each month so check back if you want to see how I put the "fun" in my project!

Friday, January 21, 2011

UFO Bust Report - Funky Santa Finished

I have a finish to report today - yay!


I was going to take it outside to photograph it. I get much better pictures outside in the morning before the sun gets too high. But it is 10 degrees this morning and I'm not that gung-ho of a photographer. Plus I'd have to take it down from its spot in the dining room. Yes - I hung up my Christmas quilt after Christmas! I'm just going to leave it up a couple of weeks.

I attached some eyelash yarn to cover the black around the center panel, plus a some buttons, bows and beads.


The beads are really hard to photograph inside. *sigh* Maybe when I take it down in a few weeks I'll take it outside and snap a few better photos.

Below is a photograph taken before I started embellishing.


Scroll up to the first photo of the whole quilt. Can you see the difference the green eyelash yarn made? Some folks liked it just fine with the black border around the center panel. For me it just drew my eye immediately to the center panel, highlighting the fact that it is a panel. I'm not embarrassed I used a panel but I didn't want it to be the first thing you noticed when you look at the quilt. For me, the green border does that. What do you think?

As a follow-up, I was successful in passing on my Cabin Lap quilt UFO to a friend at guild last Saturday. So this makes two I have marked off my list so far.

Thursday, January 20, 2011

New Aquisitions

Yesterday was the first day my classes met for Spring semester. So I am going back to not trying to post on Wednesdays, unless I feel I have time. With it being the first day of class, I did not have time yesterday! It was a good mail day though yesterday. Connecting Threads was having their books 40%. Here is what I bought.

First is Elizabeth Hartman's book. I have been quilting for 16 years but I still learned a new trick out of the basics section in the front of the book! I just love her fabric choices and her quilt backs. I bought it mostly for inspiration.


The next book I got is by Tonya Ricucci. I have been following Tonya's blog for a while and have been anxiously awaiting this book. If foresee some words in some of my upcoming work.


I also got a couple of sketchbooks. I just couldn't resist! They were half price and so cute.


The back of each of mine are green, like the spine. These are 6" by 9" and have 96 blank pages and 64 graph pages, ideal for sketching quilt designs.

Then I needed a little more to get free shipping. You know how it is. I bought myself another needle threader.


I absolutely love these threaders! I have one that I keep with my binding sewing supplies. This one will go with my hand quilting supplies.

Tuesday, January 18, 2011

Art Group Tuesday

Today I will be teaching wonky stars in my art group. Here is a photo of all the wonky blocks I have made as practice so far.


I am making all of these to finish at 9" and am using mostly reproduction or Civil War-ish fabrics so that all the blocks will play nicely together. These are all made from scraps out of my bin. When I first started quilting I really liked these fabrics and made several quilts with them. My tastes have changed, but I can't bear to throw away good fabric, even if I don't like it anymore. Once I get a good number of blocks, I will piece them together, quilt it and donate it to charity.

My first blocks were the log cabin blocks. Then did the rail fence blocks. Now I'm on to stars. The first two I made, the bottom two in the photo above, I don't like as much as the last one, the right most star. The first two stars I made, I cut three strips - 2.5", 3.5" and 4.5". For the first one, left most bottom star, I crosscut the strips into 3.5" sections. For the second one, right most bottom star, I crosscut the strips into 2.5", 3.5" and 4.5" sections. In both cases, this results in some squares, but mostly rectangles as block pieces. So the stars are not centered within the 9" finished block. For the last one, right most star, I cut 3.5" squares only, so the star is centered within the 9" finished block. I think I like this best, but I can envision a scenario in which the off-center ones would be preferable.

Monday, January 17, 2011

Good Mail Day

Friday was a good mail day for me. Look what came from my friend Stephanie, aka Mama Pea.

First she sent me some ribbon.


She bought herself some of this ribbon and blogged about it. When I saw it I knew I just had to have some too. I asked Stephanie for the manufacturer or company name but she didn't know and offered to just get me some. Isn't it awesome! And isn't Stephanie awesome for getting some for me too! Thanks so much Stephanie! If you are thinking to yourself, "I wonder what Lynn plans to do with this ribbon?" you should just hush your mouth. Since when does a girl need a plan for something before she gets it?!

Stephanie also included this beautiful hand dyed fabric with my ribbon.


These are just going to go with my other hand dyed fabrics for the moment. I do have a plan for some of these along with some of my other hand dyes, but I do not have time to tackle that just yet.

Sunday, January 16, 2011

Sketchbook Page, 2

The other day Diana Trout did a video for the sketchbook challenge blog about a doodle game. The link will take you to the blog entry with the video. The basic idea is that you draw a continuous line over the page and then go back and fill in the areas created by the continuous line. I had some time to kill on Friday afternoon while one of my students took an exam so I brought my sketchbook with me and did the exercise.


I only filled in some of the areas, the ones that spoke to me at the time. It was actually a pretty fun little exercise! Next time I will try to create a few more areas that "will speak to me" than I did the first time. Another thing I have been doing as a warm up exercise I learned from a class I took at Quilt University taught by Lily Kerns. The class was titled Playing with Lines and Shapes. She had us draw in little boxes.


I have found this to be a very helpful exercise for working out a design. You can draw the image over and over, keeping what you like from previous versions and trying out new ideas. The boxes are small. There are 25 on a standard 8.5" by 11" sheet of paper. If you draw something you like, you can scan it and enlarge it then print it out if you don't want to try redrawing it larger.

Most of the images on this page I drew while watching the Secret of the Kells. It was recommended to me by Netflix. It is animated movie targeted at kids my sons age. I did not really like the movie at all, but for me, the art work was inspiring. So I watched the whole thing and paused the movie at various points to draw things of interest to me in one of the little boxes.

Saturday, January 15, 2011

Pinwheels

I saw this video on another blog I read. It is from Bailey Girl Five's blog. The video shows you how to make four half square triangle blocks that you can turn into a pinwheel block without sewing on the diagonal. It is pretty cool and may be just the ticket for me to turn a charm pack I won into a pinwheel quilt.

Check it out.

Friday, January 14, 2011

UFO Bust Report and a Giveaway

I showed you this UFO last week and said I wasn't sure what I was going to do with it, finish it myself or pass it on.


It is folded up and packed in my bag for guild tomorrow. I am going to try to find someone else to finish it. So that's one I can check off my list!

Now for the Giveaway:

Stephanie, aka Mama Pea, is having a giveaway of a very cute Amy Butler pattern - Stash and Dash Bags. Stephanie made up some as Christmas gifts.


Didn't she do a nice job?


Go over to her blog to enter the Stash and Dash Pattern Giveaway.

Wednesday, January 12, 2011

Sketchbook Page, 1

You may have noticed the Sketchbook Challenge button on the right hand side of my blog. (click the button for more information on the Sketchbook Challenge) Yesterday I received the watercolor pencils I ordered for the Challenge. I'd really like to be able to draw better and the only way to learn is to do it. So I'm trying.


The reviews all said that they create intense color, not the usual kind of washed out color of watercolors. They were right! I enjoyed playing with these this morning and learned several things. Specifically, I learned why you should use watercolor paper when doing a watercolor project. My first attempt with these was in my sketchbook. It is made with thicker paper, but it is not watercolor paper. The paper bubbled up badly as soon as I put water on it. Luckily, I have some watercolor paper that I bought for my son. I haven't given it to him yet, so now it is mine. Maybe I'll share though.

I think a more experienced watercolor artist might find using these pencils a bit tedious. It requires two steps whereas watercolor paints require just one. First you color an area with the pencil. They color just like colored pencils. Then you drag a wet brush across the colored area and watch the magic happen.

I took some photos of my play. Here is my sketch with a little coloring. Notice that the bottom half circle is darker than the others along the stem. I had already put water on that one before I thought to grab my camera. But it gives you a really good idea of the color change that happens with water.


Then I drew in more details on the flower part and finished coloring. On this photo (below) I have painted with water the right half of the stem and all of the half circles.


Then I painted the whole thing with water. I tried several different sizes of brush and found that a very small, fine brush worked best for me. I may need to get a few more. You can really see a dramatic difference in the colors between the above and below photos!


Lastly I outlined (redrew my original pencil lines) with black marker.


Unfortunately, the center of the flower reminds me of the character in those horror films "Scream." I've never seen the movies, but I've seen images of that character all over the place. So maybe I should call this one Scream Flower. Oh well! I was really just playing with my new pencils and I had a great time with them.

Tuesday, January 11, 2011

Heart Block

One of our guild members had a granddaughter die recently in Iraq. Unfortunately, I know this is not a unique story. Too many young Americans are dying in Iraq and Afghanistan these days. I don't have an answer for this problem.

The guild is doing the only thing we know how to do, make blocks for our member in memory of her granddaughter that will be turned into a quilt. We were given a 9" square of muslin with an 8" square drawn on it. The directions were to make whatever we want, just cover the 8" square. These blocks are due on Saturday. This is what I came up with.


It took me a long time to come up with an idea. I stitched together various fabrics and cut out a heart from it. For me, it symbolizes how our hearts are broken and mended throughout our lifetime. I hope it brings my friend comfort.

Monday, January 10, 2011

Repurposing

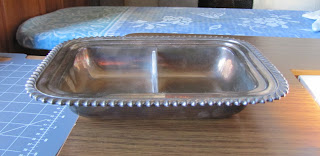
Recently I got this silver tray.


When I saw it I immediately knew what I wanted to do with it.


It has two nice sized compartments. One for a pin cushion and one for notions.


I made the pin cushion from the old cotton velvet curtains that used to hang in our living room and dining room.


I love it when a plan comes together!

Friday, January 7, 2011

First UFO Bust 2011 Report

As part of the UFO Bust I'm participating in (click on the button along the right hand side of my blog if you would like to read about it or play along), we are suppose to report on our progress on Fridays. So here is my report...

The label is going on my Funky Santa quilt!!


This is how I put my labels on when I don't piece them into the back. I sew two sides into the binding by machine and then hand stitch the other two sides down. Less hand applique this way! After I get the label all the way on, I just have a little more than one side of binding left to hand sew to the back. The sleeve is made, but won't get attached until I have done all the embellishing I want to do along the top of the quilt. Ahhh! Feels good to be so close to my first finish of the year.

In other news, while my afternoon got completely hijacked by work, when I got around to checking the mail there was a nice package waiting for me.


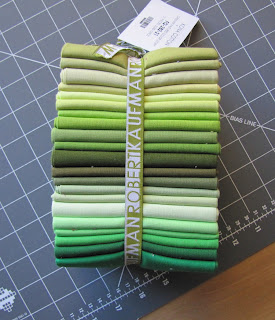
I ordered this fat quarter bundle of green Kona solids from Jackie at Canton Village Quilt Works as part of my birthday spending spree. Isn't it lovely! I think my solids stash is now complete, for the moment anyway.

Thursday, January 6, 2011

UFO List

Susan of Blackberry Creek Home Arts is hosting a UFO Bust for 2011. You can click on the button on my side bar to go directly to the rules of the UFO Bust. This is a very low pressure deal - just my style. If you want to join too, just go over to Susan's site (click the link in the first sentence or the button on the right) and sign yourself up.

My plan is just to "deal with" every UFO on my list this year. By "deal with" I mean actually pull out each one. See if I have everything necessary to finish it. Decide if I really do want to finish it. If do, then make a plan for finishing (notice I didn't say "finish it", just "make a plan to finish it"). If I don't want to finish it, get rid of it by either giving it away, throwing it away or cutting it up for use in another project and putting the unused fabrics back in my stash.

Here is my oldest UFO, I think. At least it is the oldest one I have found so far.


These blocks were leftovers from a panel I cut up and used to make a quilt for a friend in 2005. I had planned to quilt it up and give it to charity. It's been 5 years and I haven't done it. Do I still want to quilt it? I'm not sure. This may be one that I end up giving away.

So here is my list:

1. Cabin Lap Quilt (photo above) - charity
2. Mom's Mystery Quilt (this is one of my Mom's UFOs that she passed on to me)
3. Funky Santa (almost got the binding on this one!)
4. Wonky New York Beauty
5. House quilt - charity
6. Clifford quilt - charity
7. Pooh quilt - charity
8. Cars quilt - charity
9. Puzzle quilt
10. Lollipop Flowers round robin quilt
11. Bird Panel
12. Spring Panel
13. Cuddly quilt
14. Space quilt
15. Gail Garber class quilt (pieced hexagon)

This list contains only the UFOs I have currently found. I feel like there are more somewhere, but they haven't surfaced yet. When I finally switch my sewing room with the current guest room and move all my crap, I may find more. I'll let you know if I do. I'm going to try to figure out how to put this list on my sidebar, mainly as a reminder for myself.

I received one more birthday gift from the son. I failed to post a photo yesterday so I'm doing it today.


He is currently reading this book. Below the book is the gift. He made me an amulet. It has some magical powers that I don't fully understand, but I love it. This will go into my collection of treasures he has given me over the years. He is currently 8. I hope to make a small quilt to attach these treasures to someday. I will include photos of him too on the quilt.

Wednesday, January 5, 2011

Birthday Purchases

I had a great birthday. Mostly I just relaxed. I went to my local quilt shop and was there for a long time visiting with friends and shopping. Here is what I got.

Kona solids, machine needles and Quilter's Tweed

close up of the quilter's tweed

The Quilter's Tweed bundles have been at my local quilt shot for several months. I had been coveting them and decided that my birthday was an excellent excuse to get a fat quarter bundle. I have no idea what I will do with this, I just needed to own some.

After the quilt shop I played online and fondled my purchases. We had Chinese take-out for dinner and I sewed binding on the Funky Santa quilt and watched a movie in the evening. Nice and relaxing - perfect!

My solids collection has grown so much recently that I need to do some rearranging of my fabric drawers so I can fit it all in! I'll have to do that another day because today's plan is to finish the painting on my son's new desk and closet we had installed recently. He is in school today and will go to a friend's house after school so I can get a lot of painting done with minimal interruptions. The husband is skiing today and tomorrow so I don't even have him to work around. It's just Goldie and me today. She will not be happy with the painting because it will mean that she can't be with me most of the day. She is sweet but much too curious to be around wet paint!